
Some years ago, I bought an Olympus ES-10P film scanner to digitise my photos so that I could control the printing process without having to set up a colour darkroom. In the years that followed, I spent (too) many hours investigating its inner workings.
Since setting up this page, I’ve moved on to a Minolta Dimâge Scan Dual 2. Unlike the ES-10, it does unattended scanning of up to six images at a time, has a higher resolution and bit-depth, no significant problems with grainy films or high-resolution images, and needs no customisation to handle different film types. Using either Minolta’s own “Easy Scan Utility” or Ed Hamrick’s VueScan software, the Minolta produces a finished image much faster, even though the actual scan time is not hugely different.
Nonetheless, there are quite a few die-hard ES-10 users out there, and most of what follows should be of interest to them. There are also a few other web sites devoted to this scanner, so check these out:
- How to connect an ES-10S to a computer running Windows XP, courtesy of Darren Kelly.
- A shareware driver for the ES-10P under Windows 2000/XP, with a very comprehensive set of links to drivers and information from Marcelo Ragone.
- The ES-10 user group at Yahoo Groups
- A review of the ES-10 based on scans which I provided to the reviewer, Tony Sleep. The rest of his site has been archived now, but can be viewed here.
- If you want to run the ES-10 under Windows 2000 Pro or XP (Pro or Tablet version), take a look at the (now free) Microsoft Virtual PC 2004 SP1 software. To quote Microsoft, you need Windows 2000 Professional SP4, Windows XP Professional or later, or Windows XP Tablet PC Edition or later. Of course you also need a copy of Windows 95 or 98 to install on your virtual computer as well.
The Olympus ES-10 Film Scanner
The ES-10 is no longer made or supported by Olympus. There were two versions of the scanner: the ES-10P (which connected to a PC via its parallel port) and the ES-10S (which had a SCSI interface). The main difference between the two was the speed when performing high-resolution scans. The ES-10S was claimed to be over 10 times faster for a 2400 × 1600 pixel scan. Either version was capable of very good quality scans (those shown in my photo gallery were only done at 640 × 400 pixel resolution, so don’t show its full capabilities).
There are a number of issues which should concern users of this scanner in particular. The most important are related to driver software, quantisation, sensor alignment, and film characteristics. At the end of this page, I’ve included some recommendations for getting the best quality scans out of the ES-10, and some software for the more adventurous among you. I’ve also included some example scans to show the benefits of using that software, and to compare the ES-10 with the new(er) Minolta Dimâge Scan Dual 2.
Driver Software
For the ES-10P, the only versions of Windows for which drivers exist are 3.1, 95 and 98. I’ve been told they also work under Windows ME, and given the similarity between ME and 9x, you can be pretty sure that’s right.
Although Olympus never explicitly developed any drivers to run under Windows 2000 or XP, it is still possible to use the ES-10 on a modern PC. The technically simplest approach is to configure your PC to dual boot, giving you the option of running Windows 9x instead. You then boot into the old operating system to do your scans and re-boot to Windows 2000 or XP to continue your work. Obviously this isn’t very convenient, but it is safe and guaranteed to work.
I’ve been told that the SCSI ES-10S will run with Windows XP, but it needs the correct Windows ASPI driver from Adaptec (see Microsoft Knowledge Base Article 300674). The driver version v4.71.2 can be downloaded here.
The alternative is to use some additional software to fool the ES-10 driver into thinking it’s in a Windows 9x system, even when it’s not. Some time ago, Ian Boyes brought a program called “Porttalk” to my attention. This allows you to drive the ES-10P from Windows XP, 2000, or NT, with some limitations. A similar but more powerful package is Bochs. Let me know if you get either of these to work, either with the Olympus drivers or Valeriy Mikheew’s SCAN.EXE, described below.
More recently, Microsoft released their VirtualPC software, which allows you to have a virtual Windows 9x machine running from inside 2000 Pro or XP (Pro or Tablet versions). The 2004 edition of the software is now available for free, and I believe it should work with the ES-10. As before let me know if you get it going, because no-one I know has managed it yet!
The latest and final Windows driver versions are 2.01 for the ES-10S and 2.02 for the ES-10P. Unfortunately, although the latter version does exist, it was only supplied in a limited geographical region, and has never appeared on any official web site (that I’m aware of). This is a shame because it is significantly easier to use than the earlier versions. In an effort to marginally reduce the overall level of frustration in the Universe, I’ve put a copy here. This is quite a large file, so if you have trouble downloading it, try my other site (x10 or Tripod, whichever this site isn’t).
Olympus’ European web site doesn’t even mention the ES-10 any more, but drivers for both versions can be found on their Japanese site. The following driver versions are available there (the page is in Japanese, but with English text next to each link, so you should be able to figure out which link to click on)…
|
If you can’t decipher the Japanese characters, just look for the file names: those beginning ESS are for the SCSI version, while ESP denotes the parallel port version. As mentioned above, you’ll need a program like “Porttalk” if you want to run the ES-10P under ‘newer’ operating systems such as Windows NT, 2000 or XP, and even then it may not work. Otherwise your best bet is to use Microsoft Virtual PC and run Windows 9x from within the operating system.
Although not completely bug-free, the v1.3 drivers are an improvement on v1.2: the TWAIN data source operates in 32-bit mode and, more importantly, fixes a bug in memory-mode data transfers (this affected acquire functions in a number of packages including Paint Shop Pro). The version 2 drivers are a further improvement, but are more difficult to get hold of (see above). I have also had a report of display problems with the version 2 TWAIN interface, but again, only when used with Paint Shop Pro .
For scanning slides, however, I’d recommend Valeriy Mikheew’s home-brew DOS-based program, SCAN.EXE, which can automate the adjustment of the ES-10P’s control parameters. It also allows you to scan arbitrary predefined regions of the film at a predefined resolution, and produces histogram data at the same time. You can get his program, including source code, by clicking here. Unfortunately I haven’t been able to get it to produce acceptable scans of negatives.
Quantisation
With any scanner which produces only 8 bits of data for each primary colour (red, green or blue), it’s important that the scan is optimised. If there are only 8 bits of data to work with, drastic post-scan colour correction can result in posterisation, no matter how good the software. Therefore the scan controls (intensity, R, G and B black points, white points, and gammas) should always be set as accurately as possible prior to the scan.
In the case of the ES-10, the most important control is the intensity slider, since this changes the integration time of the scan, controlling the input to the analogue-to-digital converter (ADC), rather than manipulating the values after they’ve been digitised. Once digitised, much of the image information is irrevocably lost. Thus optimising the input to the ADC is vital.
Sensor Alignment
The ES-10 uses a CCD sensor array to convert the image on the film into digital form. In the length-wise direction (when scanning a strip of film), there is a small offset between the green sensors and the others. In the cross-wise direction, there is a similar offset between the red and blue sensors. The result of this is that any sharp length-wise features on the film will often have cyan or yellow fringes, one pixel wide. Any cross-wise features may similarly have green or magenta fringes.
While most photographs are not sharp enough to resolve such fine details, and so don’t show these effects, there are two cases where they can be seen:
- Technical or architectural images which have been accurately aligned and focussed: these often include near-horizontal and near-vertical high-contrast edges, which will sometimes show the fringes, as described above.
- High speed (grainy) film: the individual grains may have sharp enough edges to produce an irregular patterning as a result of this effect. This exaggerates the effect of the film’s true grain structure.
The visibility of these effects is minimised by scanning at the full resolution of the ES-10 (1770 dpi), but the best way to deal with them is described below.
Scanning different types of film stock is made possible by sets of parameters describing the range and scale of colours present in each film. The ES-10 is unusual in that these parameters control the digitisation process itself, including a non-linear relationship between film density and ADC output. The up-shot of this is that a simple 8-bit ADC can handle slides and a wide range of negative films, even though the range of densities in one film can be very different from that in another. To get the best out of the ADC’s range, these parameters should really be adjusted individually to scan each specific film type (or to cope with badly processed, or badly exposed, films).
The bad news is that Olympus only supply parameters for a few specific films, including some (for 35mm monochrome transparency and 35mm ISO 400 Fuji colour negative) which were never publicised, and were not accessible from the standard driver menu. Additionally, they now supply different parameters with the parallel port and SCSI versions of the scanner. The latter also includes settings for 35mm Kodak Gold film, and separate ISO 100 and 400 parameters for Agfa APS colour negative films.
It’s also worth mentioning that, in virtually all cases, the “Others” film types have been completely redundant: they were almost invariably direct copies of the corresponding Kodak settings. The only exception to this was an old APS “Others” setting which contained the same parameters as the 35mm Kodak one. I suspect that this was a mistake, and that it was intended to be the same as the APS Kodak setting (as it is in version 2).
Recommendations
- Don’t stick to the ‘correct’ film type for your film: experiment with different settings to get as close as possible to the image you want. For example, I’ve found the ‘Agfa negative’ setting to work well with Kodak Ektar 1000 film. If you’re feeling adventurous, you can develop your own parameter sets using a text editor in conjunction with my program, PM2SPM.EXE.
- Always set the ES-10’s intensity slider as low as possible (without losing shadow detail) when scanning negatives, but as high as possible (without blowing any highlights) when scanning slides. This increases the integration time and so gives better quality images, although it also slows the scanning process. After scanning, use retouching software to set the contrast, brightness and colour balance to your own preference.
- If you have a problem with grain, or coloured fringes around sharp edges, and you only want a low resolution image, slightly defocus the scanner. For example, if scanning a full frame of 35mm film to produce a 600 × 400 image, focus the scanner correctly, but then move the focus wheel a further 5 to 10mm before scanning the image at the desired resolution. This will blur the image enough to suppress any artefacts, without visibly affecting the sharpness of the final image. It will also allow you to scan at a low resolution, saving a lot of time.
- If you have a problem with grain, or coloured fringes around sharp edges, but you want a high resolution image, or if you need best possible quality at a lower resolution, focus as accurately as possible and scan at full resolution. Then apply a 3 × 3 pixel median filter to suppress any grain or fringes (use a 5 × 5 filter for particularly grainy films). Finally resize the image, using interpolation, in whatever retouching software you prefer.
Grow your own Film Types
It used to be easy to edit the film parameters: driver versions prior to 1.3 stored the parameters for each film type separately in ASCII text files which could be edited by hand. From version 1.3 onwards, however, all the film types have been specified in a single, binary file, making them difficult to change.Thus the only bad thing about the newer drivers is that changes to their parameter files require a binary file editor, or at least a program to convert old-style text files to the new binary format.
Olympus supply different binary files for each language, but the English ones are FPARA_EN.SPM (for the ES-10P) and FPARASEN.SPM (for the ES-10S). The version 1.3 drivers keep these files in the installation directory, but with version 2.0, they’re to be found below the PC’s TWAIN32 directory (itself a subdirectory of the Windows system directory).
Olympus do not intend users to edit these files, but it can be worth having a go if you’re doing a lot of scanning, especially if you’re using film types which Olympus haven’t catered for. SCAN.EXE provides an interface to change the parameters, but if you want to stick with the Olympus drivers, you can use my program, PM2SPM.EXE. The Zip file here includes the program, which can modify individual entries in new-format binary files, using parameters selected either from old-style text files or from other new binary parameter files. It also includes BASE.SPM, which contains all the film type parameters released by Olympus in a single file, while README.TXT gives (very) brief instructions on how to use the program in conjunction with BASE.SPM to change the default film type selected when the ES-10 driver starts up. It also lists all the available sets of film type parameters.
I’ve also included a set of ‘.SPM’ files which can be copied over the FPARA_EN.SPM or FPARASEN.SPM files supplied by Olympus, to make different versions of their parameters available via the usual menu. To make some of the extra sets of parameters available, I’ve used the slot allotted to “Others” on the film type selection menu. These were redundant anyway, so nothing is lost by this.
If you want them, the original ‘.P_M’ text-format parameter files can be obtained by downloading any of the pre-version 1.3 drivers from the above sites. You can then edit them and run them through PM2SPM.EXE to customise the new driver to your heart’s content.
As one final bonus, you can download a set of parameters I’ve found to work well with Kodak Royal Gold 1000 (RF 1000) here. Of course you’ll need to get PM2SPM.EXE as well if you want to use them. They may work for other film types too, but I haven’t tried any myself so I make no guarantees. Also I should point out that my customised parameters will only work correctly with the ES-10P, since although the file format is the same for the ES-10S, the values of the parameters seem to be different.
What Difference Does It Make?
To give you some idea of the improvement you can get by adjusting the film type parameters, here are some scans of a standard Kodak Q-60 target. They have all had their white points, black points, and individual red, green and blue gammas set to give directly comparable images.
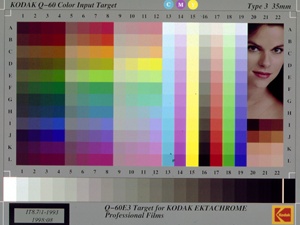
Olympus ES-10 / V2.02 driver
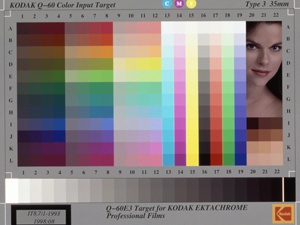
Minolta Dimâge Scan Dual 2
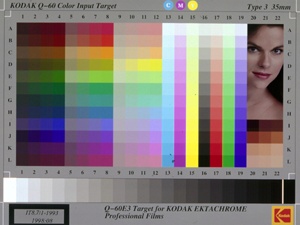
Olympus ES-10 / SCAN.EXE
The upper scan was made with the standard Olympus driver and 35mm colour slide parameters. The middle scan is for reference, produced with a Minolta Dimâge Scan Dual 2 (which gives a truer representation than the ES-10, thanks to the Minolta’s 12 bits per colour resolution). Finally, the lower image was produced by SCAN.EXE.
The most visible difference between the Olympus scan and that from SCAN.EXE, is in the model’s skin tone. In the original slide it’s distinctly pink. The false yellowish cast produced by the standard Olympus parameters is completely absent from the SCAN.EXE image. The Olympus scan’s colours also tend to be over-saturated and the artefacts around high-contrast edges are exaggerated. The latter can be seen more clearly in the detailed scans below:
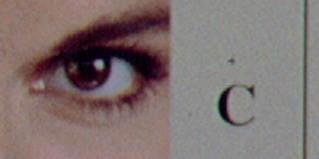
Olympus ES-10 / V2.02 driver
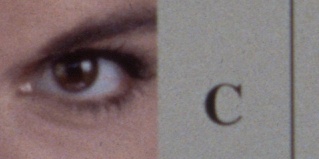
Minolta Dimâge Scan Dual 2
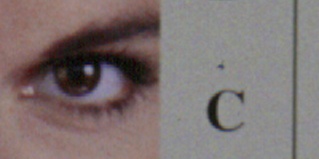
Olympus ES-10 / SCAN.EXE
The vertical black line shows distinct coloured fringes in the Olympus driver’s scan, but the effect is much less noticeable in the SCAN.EXE image.
|
|
Last modified: 23:10, Saturday, 13 January, 2018
Primary host: x10
Mirror: Tripod